web関係の会社に入って2年目の私が、初めてCPT UI(Custom Post Type UI) と ACF(Advanced Custom Fields)を使って苦労した点や実装方法を記録用も兼ねて書いてみました。CPT UI(Custom Post Type UI) と ACF(Advanced Custom Fields)の実装方法を調べても、初心者向けではなかったり、実装方法の一部しか載っていないなどが多かったため今回は詳しく書けたらなと思います。
なぜCPT UIとACFを導入したのか
私が担当したのは自治体のWebサイト制作案件でした。
サイト公開後は先方が自分たちでページを更新していく予定ですが、担当者はWebの専門知識を持っていません。
「入力欄にテキストや画像を入れるだけで、決まったフォーマットで更新できるようにしてほしい」
そんな要望に応えるため、CPT UI(Custom Post Type UI) と ACF(Advanced Custom Fields) を組み合わせて導入しました。
カスタム投稿タイプを作成する
ここからはカスタム投稿タイプの作成方法をお伝えします。
カスタム投稿タイプを作成する際は以下の項目に注意して作成しました。
- 投稿タイプのスラッグはディレクトリマップをもとに決定
- 管理画面でのラベルを、更新担当者が直感的に理解できるように設定
- アーカイブを有効にして、一覧ページも自動生成できるようにする
CPT UIをインストールする
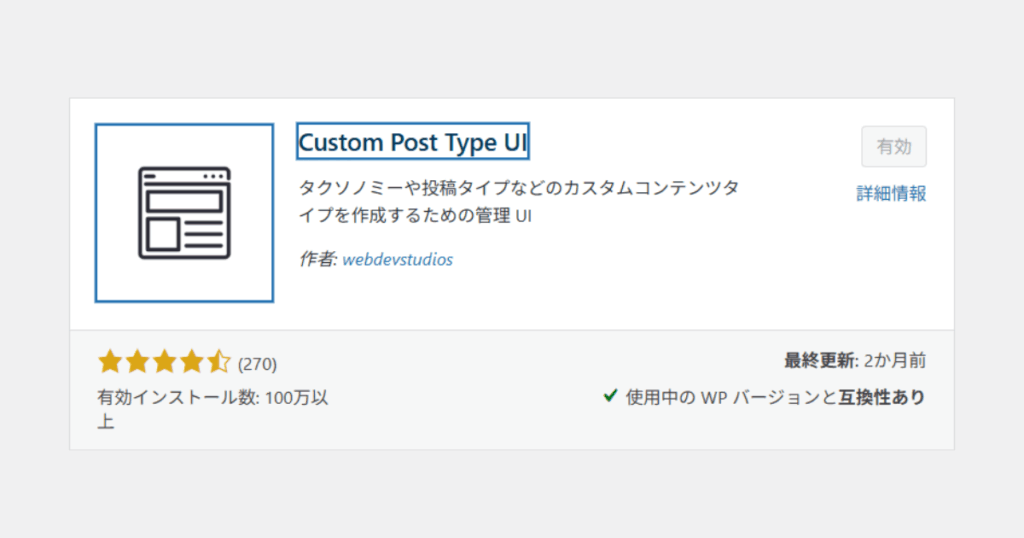
ここに関してはほかのプラグインと変わらず、WordPress(ワードプレス)にログインしたら、サイドバーの[プラグイン]→、[新規追加]をクリックして、[プラグインの検索]をします。「CPT UI(Custom Post Type UI)」を検索し、インストールしたら有効化してください。
カスタム投稿タイプを作る
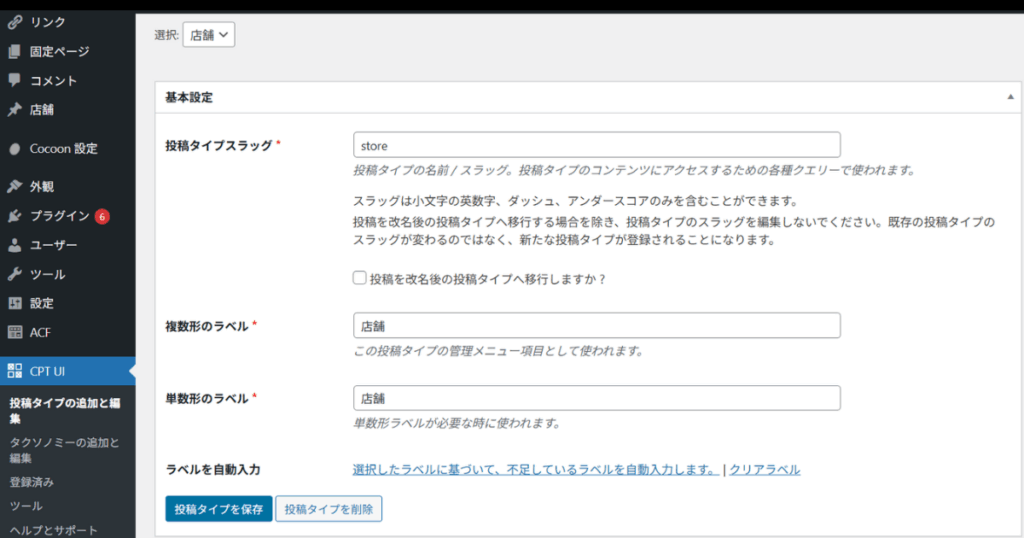
管理画面のサイドバーに「CPT UI」が追加されるので、
「Add/Edit Post Types(投稿タイプの追加/編集)」 をクリックします。
入力する主な項目は以下です:
- Post Type Slug(投稿タイプスラッグ)
- 英小文字とハイフンで指定
- URLに使われるので短くわかりやすく
- 英小文字とハイフンで指定
- Plural Label(複数形のラベル)
- 管理画面の見出しに使われる
- 管理画面の見出しに使われる
- Singular Label(単数形のラベル)
- 個別投稿の見出しに使われる
- 個別投稿の見出しに使われる
設定で特に注意するポイント

基本設定を入力し下にスクロールしていくと設定画面があります。
CPT UIの設定画面には多くの項目がありますが、最低限意識すべきは以下です。
- Has Archive(アーカイブ有効化)
- チェックを入れると一覧ページ(archive-◯◯.php)が有効になる
- 一覧表示が必要なら必ず有効に
- Supports(サポート項目)
- 投稿画面に表示する入力欄を選択(タイトル・アイキャッチなど)
- 余分なものは外し、ACFで作るフィールドに任せるとスッキリ
- Menu Icon(メニューアイコン)
- 管理画面の左メニューに表示されるアイコン
- Dashiconsから選べるので、担当者が直感的に理解しやすいものを選ぶ
ACFでカスタムフィールドを作る
プラグイン導入

- 管理画面 → [プラグイン] → [新規追加]
- 「Advanced Custom Fields」で検索 → インストール & 有効化
サイドメニューに「カスタムフィールド」が追加されます。
フィールドグループの作成
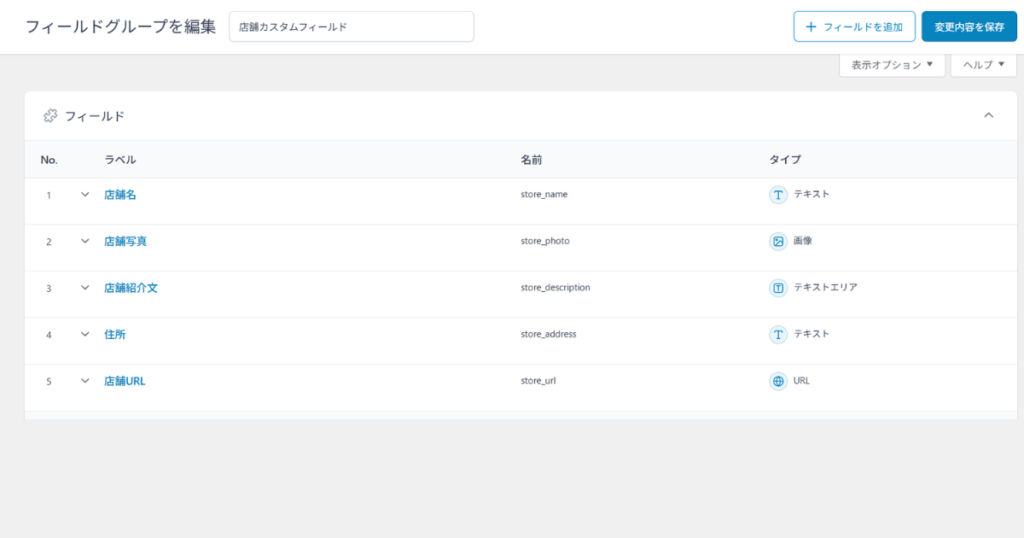
- [カスタムフィールド] → [フィールドグループを追加]
- フィールドグループ名:「店舗情報フィールド」
追加するフィールド
例として以下を追加:
| フィールドラベル | フィールド名 | タイプ | 説明 |
| 店舗名 | store_name | テキスト | 店舗の名前 |
| 店舗写真 | store_photo | 画像 | 店舗の外観や内観写真 |
| 住所 | store_address | テキスト | 店舗の所在地 |
| 店舗紹介文 | store_description | テキストエリア | 紹介文やキャッチコピー |
| 店舗URL | store_url | URL | 店舗の公式サイトや予約ページ |
ロケーションルール
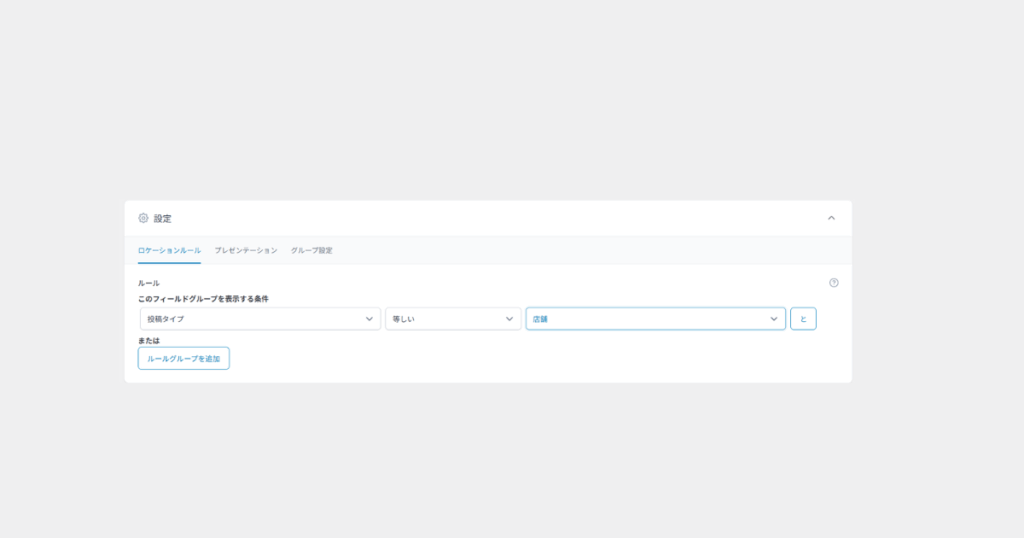
- 「投稿タイプ」 → 「等しい」 → store
これで「店舗情報」投稿にだけ、上記フィールドが表示されるようになります。
single-store.php で詳細ページを作る
子テーマに single-store.php を作成し、以下のように出力します。
<?php
/**
 * tmp/single-store.php(本文)
 * 並び順:概要 → 画像 → 紹介
 * ACF(大小文字/ハイフン・アンダースコア両対応):
 *  - store_overview / store-overview : group{ nearest_station / genre / regular_holiday / budget }
 *  - store_img / store-img           : image(array/url 両対応)
 *  - introduction_group / Introduction-group :
 *       { introduction_heading / Introduction-heading,
 *         introduction_text / Introduction_text }
 */
if ( ! defined('ABSPATH') ) exit;

/* 便利ヘルパ */
function acf_get_first(array $names) {
  foreach ($names as $name) {
    if ( function_exists('get_field') ) {
      $v = get_field($name);
      if ($v !== null && $v !== '') return $v;
    }
  }
  return null;
}
function pick_first(array $src = null, array $keys = []) {
  if (!is_array($src)) return null;
  foreach ($keys as $k) {
    if (array_key_exists($k, $src) && $src[$k] !== '' && $src[$k] !== null) return $src[$k];
  }
  return null;
}
function acf_img_url($img, $fallback = '') {
  if (is_array($img)) return $img['url'] ?? $fallback;
  if (is_string($img)) return $img ?: $fallback;
  return $fallback;
}
function safe_text($text) {
  if ($text === null || $text === '') return '';
  return (strpos($text, '<') !== false) ? wp_kses_post($text) : nl2br(esc_html($text));
}
?>

<main id="single-store" class="content">
  <?php if ( have_posts() ) : while ( have_posts() ) : the_post(); ?>

    <?php
      $store_title = get_the_title();

      // 店舗概要(group)
      $overview = acf_get_first(['store_overview','store-overview']);
      $nearest_station = pick_first($overview, ['nearest_station','nearest-station']);
      $genre           = pick_first($overview, ['genre']);
      $regular_holiday = pick_first($overview, ['regular_holiday','regular-holiday']);
      $budget          = pick_first($overview, ['budget']);

      // 画像(image)
      $store_img_raw = acf_get_first(['store_img','store-img']);
      $store_img_url = acf_img_url($store_img_raw);
      $store_img_alt = (is_array($store_img_raw) && !empty($store_img_raw['alt'])) ? $store_img_raw['alt'] : $store_title;

      // 店舗紹介(group)
      $intro = acf_get_first(['introduction_group','Introduction-group','Introduction_group','introduction-group']);
      $intro_heading = pick_first($intro, ['introduction_heading','Introduction-heading','Introduction_heading','introduction-heading']);
      // 本文はグループ内優先。無ければ直参照も試す
      $intro_text = pick_first($intro, ['introduction_text','Introduction_text','Introduction-text','introduction-text']);
      if ($intro_text === null) {
        $intro_text = acf_get_first(['introduction_text','Introduction_text','Introduction-text','introduction-text']);
      }

      $printed = false; // 何かしら本文が出たか
    ?>

    <!-- タイトル -->
    <h1 class="entry-title"><?php echo esc_html($store_title); ?></h1>

    <!-- ▼ 店舗概要(先に表示) -->
    <?php if ( $nearest_station || $genre || $regular_holiday || $budget ) : $printed = true; ?>
      <section class="section section--overview">
        <h2 class="section-title">店舗概要</h2>
        <dl class="store-meta">
          <?php if ($nearest_station) : ?><dt>最寄り駅</dt><dd><?php echo esc_html($nearest_station); ?></dd><?php endif; ?>
          <?php if ($genre)           : ?><dt>ジャンル</dt><dd><?php echo esc_html($genre); ?></dd><?php endif; ?>
          <?php if ($regular_holiday) : ?><dt>定休日</dt><dd><?php echo esc_html($regular_holiday); ?></dd><?php endif; ?>
          <?php if ($budget)          : ?><dt>予算</dt><dd><?php echo esc_html($budget); ?></dd><?php endif; ?>
        </dl>
      </section>
    <?php endif; ?>

    <!-- ▼ 画像(あとに表示) -->
    <?php if ( $store_img_url || has_post_thumbnail() ) : $printed = true; ?>
      <section class="section section--hero">
        <?php if ( $store_img_url ) : ?>
          <img class="hero-image" src="<?php echo esc_url($store_img_url); ?>" alt="<?php echo esc_attr($store_img_alt); ?>">
        <?php else : ?>
          <?php the_post_thumbnail('large', ['class' => 'hero-image']); ?>
        <?php endif; ?>
      </section>
    <?php endif; ?>

    <!-- ▼ 店舗紹介 -->
    <?php if ( $intro_heading || $intro_text ) : $printed = true; ?>
      <section class="section section--introduction">
        <?php if ($intro_heading) : ?>
          <h2 class="section-title"><?php echo esc_html($intro_heading); ?></h2>
        <?php endif; ?>
        <?php if ($intro_text) : ?>
          <div class="intro-text">
            <?php echo safe_text($intro_text); ?>
          </div>
        <?php endif; ?>
      </section>
    <?php endif; ?>

    <!-- 何も出なかった場合の保険(本文を出す) -->
    <?php if ( ! $printed ) : ?>
      <section class="section">
        <div class="entry-content"><?php the_content(); ?></div>
      </section>
    <?php endif; ?>

  <?php endwhile; endif; ?>
</main>
archive-store.php で一覧ページを作る
子テーマに archive-store.php を作成し、店舗一覧をカード表示にします。
<div class="stores-grid">
  <?php if ( have_posts() ) : while ( have_posts() ) : the_post(); ?>
    <a href="<?php the_permalink(); ?>" class="store-card">
      <?php if( get_field('store_photo') ): ?>
        <div class="thumb">
          <img src="<?php echo esc_url(get_field('store_photo')['url']); ?>"
               alt="<?php the_field('store_name'); ?>">
        </div>
      <?php endif; ?>
      <h2><?php the_field('store_name'); ?></h2>
      <p><?php the_field('store_address'); ?></p>
    </a>
  <?php endwhile; else: ?>
    <p>店舗情報はまだありません。</p>
  <?php endif; ?>
</div>
ローダーを作成して共通化する
CPT UIとACFを使うと、投稿タイプごとに single-{post_type}.phpや archive-{post_type}.php というテンプレートが必要になります。
ただ、同じようなコードを何度も書くのは面倒なので、ローダーを使って共通化しておくと便利です。
ローダーの考え方
「ローダー」とは、テンプレートを呼び出すためのシンプルなファイルです。
実際の中身は tmp フォルダなどにまとめておき、single や archive のファイルは「呼び出すだけ」にします。
実装例
single-store.php
<?php
/**
 * single-store.php(ローダー/原因つぶし版)
 * - ヘッダー/フッターの表示
 * - tmp/single-store.php の存在確認 → あれば読み込み
 * - 無ければフォールバック(タイトル + 本文)を出す
 */
if ( ! defined('ABSPATH') ) exit;

get_header();

// まず WP 標準で探す(子→親:今回は親のみだが安全のため)
$template_slug = 'tmp/single';
$template_name = 'store'; // → tmp/single-store.php
$located = locate_template( array( "$template_slug-$template_name.php" ) );

if ( $located && file_exists( $located ) ) {
  // 本文テンプレが見つかった → 読み込む
  get_template_part( $template_slug, $template_name );
} else {
  // 見つからない場合のフォールバック(真っ白防止)
  if ( current_user_can('manage_options') ) {
    echo '<!-- WARN: /tmp/single-store.php が見つかりません。single-store.php のローダーは動いています。 -->';
  }
  ?>
  <main class="content">
    <?php if ( have_posts() ) : while ( have_posts() ) : the_post(); ?>
      <h1 class="entry-title"><?php the_title(); ?></h1>
      <div class="entry-content"><?php the_content(); ?></div>
    <?php endwhile; endif; ?>
  </main>
  <?php
}

get_footer();
archive-store.php
<?php
get_header();
cocoon_template_part('/tmp/archive-store.php'); // 中身を読み込む
get_footer();<?php
if ( ! defined('ABSPATH') ) exit;
get_header();
?>
<main id="archive-store" class="content">
  <header class="page-header">
    <h1 class="page-title">店舗一覧</h1>
  </header>

  <?php if ( have_posts() ) : ?>
    <div class="stores-grid">
      <?php while ( have_posts() ) : the_post(); ?>
        <?php
          $store_title = get_the_title();
          $img_raw = function_exists('get_field') ? ( get_field('store_img') ?: get_field('store-img') ) : null;
          $img_url = (is_array($img_raw) ? ($img_raw['url'] ?? '') : (is_string($img_raw) ? $img_raw : ''));
          $img_alt = is_array($img_raw) && !empty($img_raw['alt']) ? $img_raw['alt'] : $store_title;

          $ov = function_exists('get_field') ? ( get_field('store_overview') ?: get_field('store-overview') ) : null;
          $nearest = is_array($ov) ? ($ov['nearest_station'] ?? $ov['nearest-station'] ?? '') : '';
          $genre   = is_array($ov) ? ($ov['genre'] ?? '') : '';

          $meta = array_filter([$nearest, $genre]);
        ?>
        <a href="<?php the_permalink(); ?>" class="store-card">
          <div class="store-thumb">
            <?php if ( $img_url ) : ?>
              <img class="store-thumb__img" src="<?php echo esc_url($img_url); ?>" alt="<?php echo esc_attr($img_alt); ?>">
            <?php elseif ( has_post_thumbnail() ) : ?>
              <?php the_post_thumbnail('medium', ['class' => 'store-thumb__img']); ?>
            <?php else : ?>
              <div class="store-thumb__noimg">No Image</div>
            <?php endif; ?>
          </div>
          <div class="store-card__body">
            <h2 class="store-card__title"><?php echo esc_html($store_title); ?></h2>
            <?php if ( $meta ) : ?>
              <p class="store-card__meta"><?php echo esc_html(implode(' / ', $meta)); ?></p>
            <?php endif; ?>
          </div>
        </a>
      <?php endwhile; ?>
    </div>

    <nav class="pagination">
      <?php the_posts_pagination([
        'mid_size'  => 1,
        'prev_text' => '前へ',
        'next_text' => '次へ',
      ]); ?>
    </nav>

  <?php else : ?>
    <p>店舗情報はまだありません。</p>
  <?php endif; ?>
</main>
<?php get_footer(); ?>
ローダーを使うメリット
- 投稿タイプが増えても、ローダーはほぼコピペでOK
- 本体の中身は
tmpフォルダ内のファイルだけ修正すればいい - ファイル管理がシンプルになり、修正もしやすくなる
注意点
- Cocoonを使っていない場合は
get_template_part()に書き換える - フォルダのパスは正しく設定すること
このローダーを入れておくと、投稿タイプが増えてもファイル構成がゴチャゴチャにならず、管理がとてもラクになります。
5. 実際にやってみての注意点
- CPT UIとACFだけで枠組みは完成する → 実装自体は理解できれば簡単
- singleとarchiveの両方を用意しないと片手落ち
- CSS調整が必須:そのままだと質素で見づらい
私は最初プラグインを追加してカスタム投稿タイプを作成して、カスタムフィールドを作成すればできる物かと思っていましたが実際はそれらを表示させるためのphpコードが必要でした、またアーカイブページを作成する場合アーカイブページを表示させるためのコードも作成しなくてはなりません。
そうして表示できたページを見てみるとかなり質素で、ただ表示させただけのページcssでの調整と装飾は必須です。
学びとこれから使う人へのアドバイス
今回の経験から得たポイントをまとめます。
- CPT UIとACFの組み合わせで、知識がない人でも更新できる仕組みが作れる
- phpの理解がないと実装は難しい
- 実装直後は見栄えが質素なので、CSS調整を前提にしておく
- 実装自体は難しくないが、CSS調整の工数を見込んでおくべき
まとめ
CPT UIとACFを使用することでWord Pressの知識がない方でも更新ができる設計をすることができます。
ですがphpをいじって作成をするため、知識がない場合最悪画面が真っ白になってしまうこともあると思います。
今回私は案件でCPT UIとACFを使用するとなり、かなり調べ、実際にテストサイトで実装をしてみて理解を深めてから案件で実装を進めました。
また設定などの種類もかなり多く、フィールド名などの間違えがあり場合そのフィールドは表示されなくなったりしてしまうためそのあたりにはかなり慎重にチェックすることをお勧めします。
このようにこれら二つのプラグインを使用することで簡単に更新と管理しやすい投稿タイプを作成することができるので、皆さんもぜひ実装してみて下さい。